Pololu Blog »
Posts tagged “raspberry pi”
You are currently viewing a selection of posts from the Pololu Blog. You can also view all the posts.
Popular tags: community projects new products raspberry pi arduino more…
Introducing the 3pi+ 2040 Robot
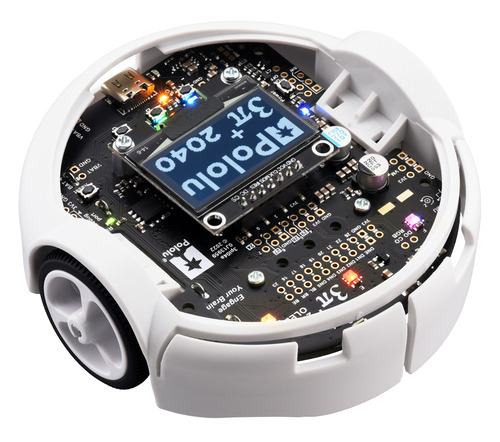
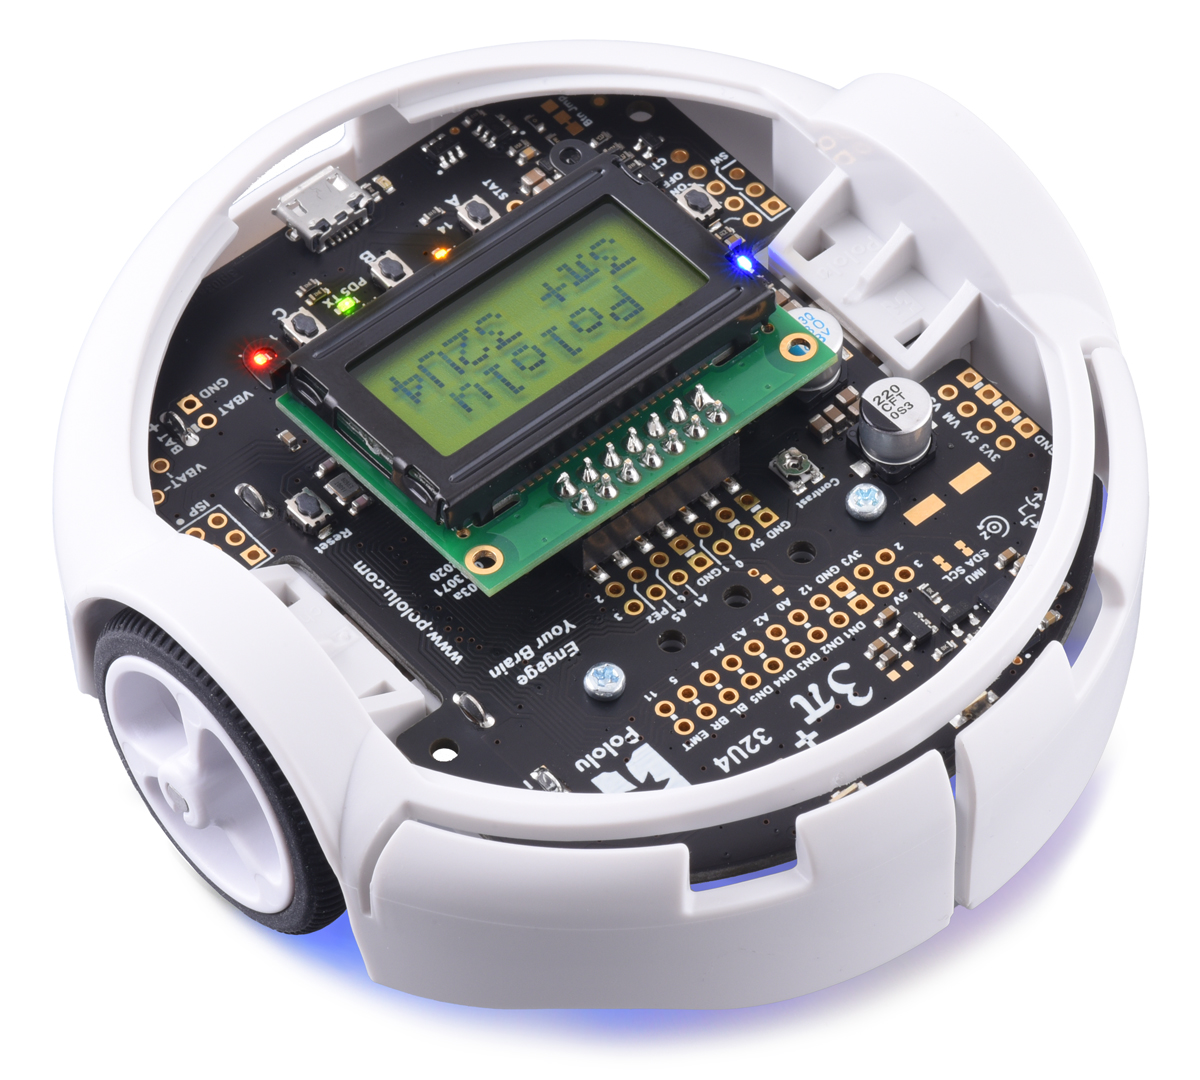
I am super excited to introduce our newest robot, the 3pi+ 2040. This robot combines the 3pi+ chassis, which we initially released in late 2020, with the power of the Raspberry Pi RP2040 microcontroller. Here is a quick overview of its features:
 |
 |
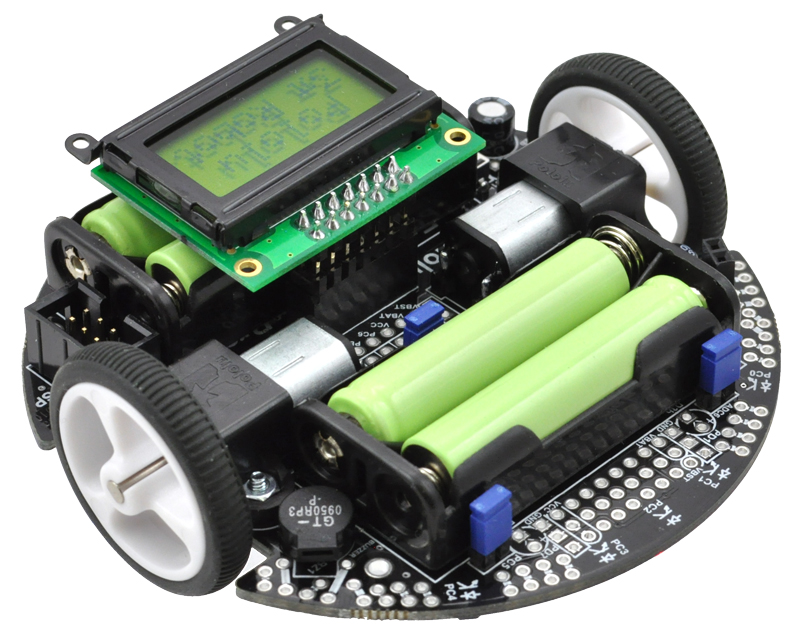
This summer will mark 15 years since we released our original 3pi robot, which was designed to be fast enough to be competitive in line following and maze solving events. The high speed offers interesting programming challenges not present in typical robot kits of that era; here is a video from back then in which Ben demonstrates his 3pi learning a maze and then going extra fast on longer straightaways:
Although we developed our first injection-molded parts (wheels, ball caster, and motor mounting brackets) for that design, it was still largely a “PCB on wheels” kind of robot. The next-generation 3pi+, with a chassis mechanically independent of any circuit board, had been in development for several years when the coronavirus pandemic hit in early 2020. We kept working on it throughout that year, culminating with the November release of the 3pi+ 32U4.
|
|
The 3pi+ delivered the most-requested feature missing from the 3pi, wheel encoders, along with many other improvements including a full IMU, bumpers, and programmability over USB (the 3pi required an external AVR programmer). With its support in the Arduino environment, the ATmega32U4 continues to offer a good entry point for working with microcontrollers, but the 8-bit architecture and 32 KB of program memory feel increasingly outdated and constraining, especially with the new sensors available on the 3pi+.
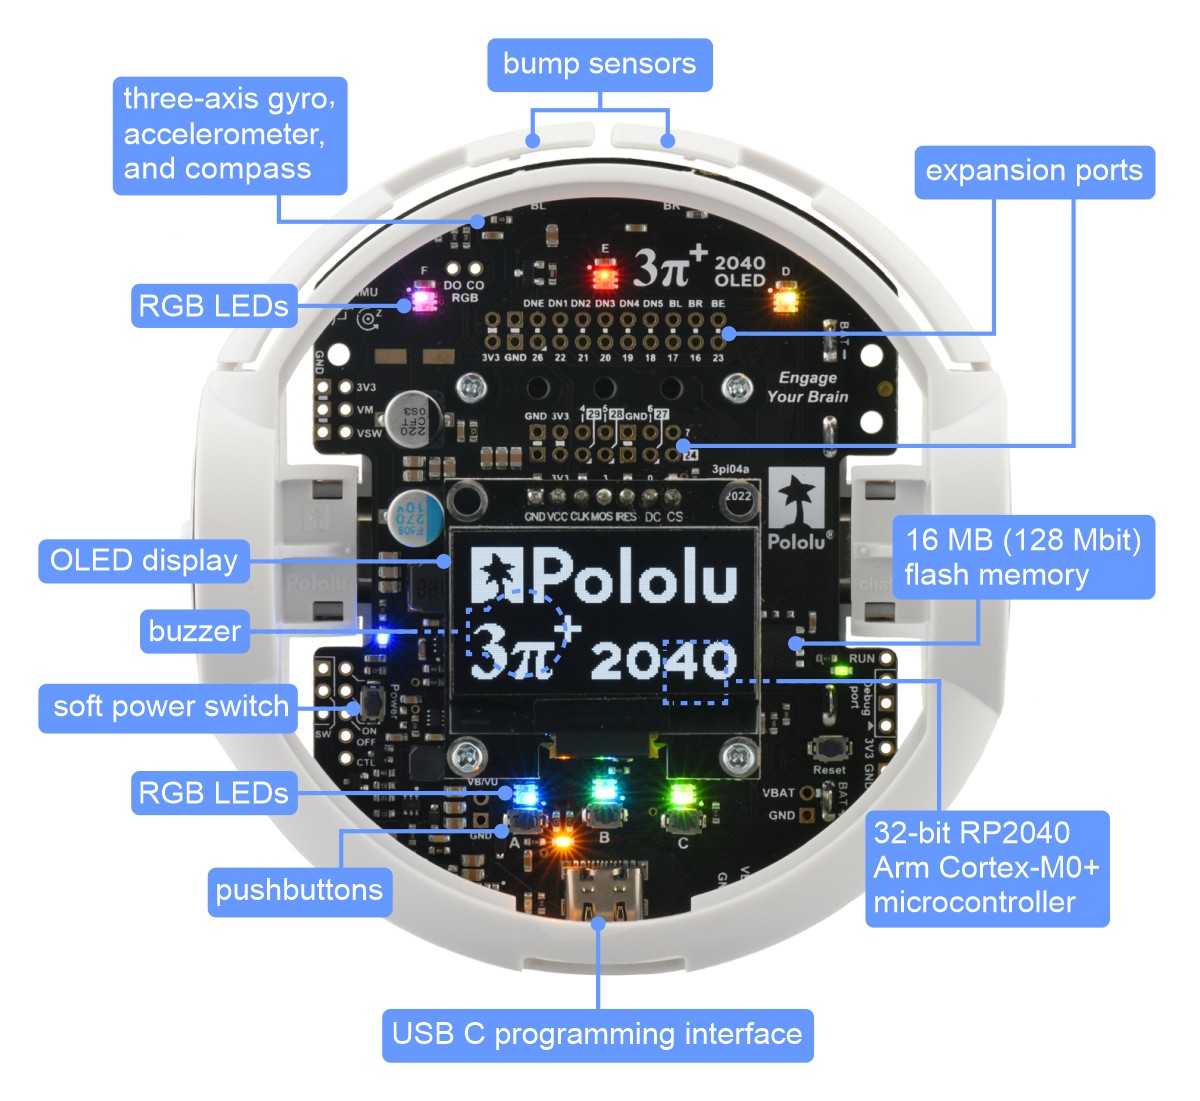
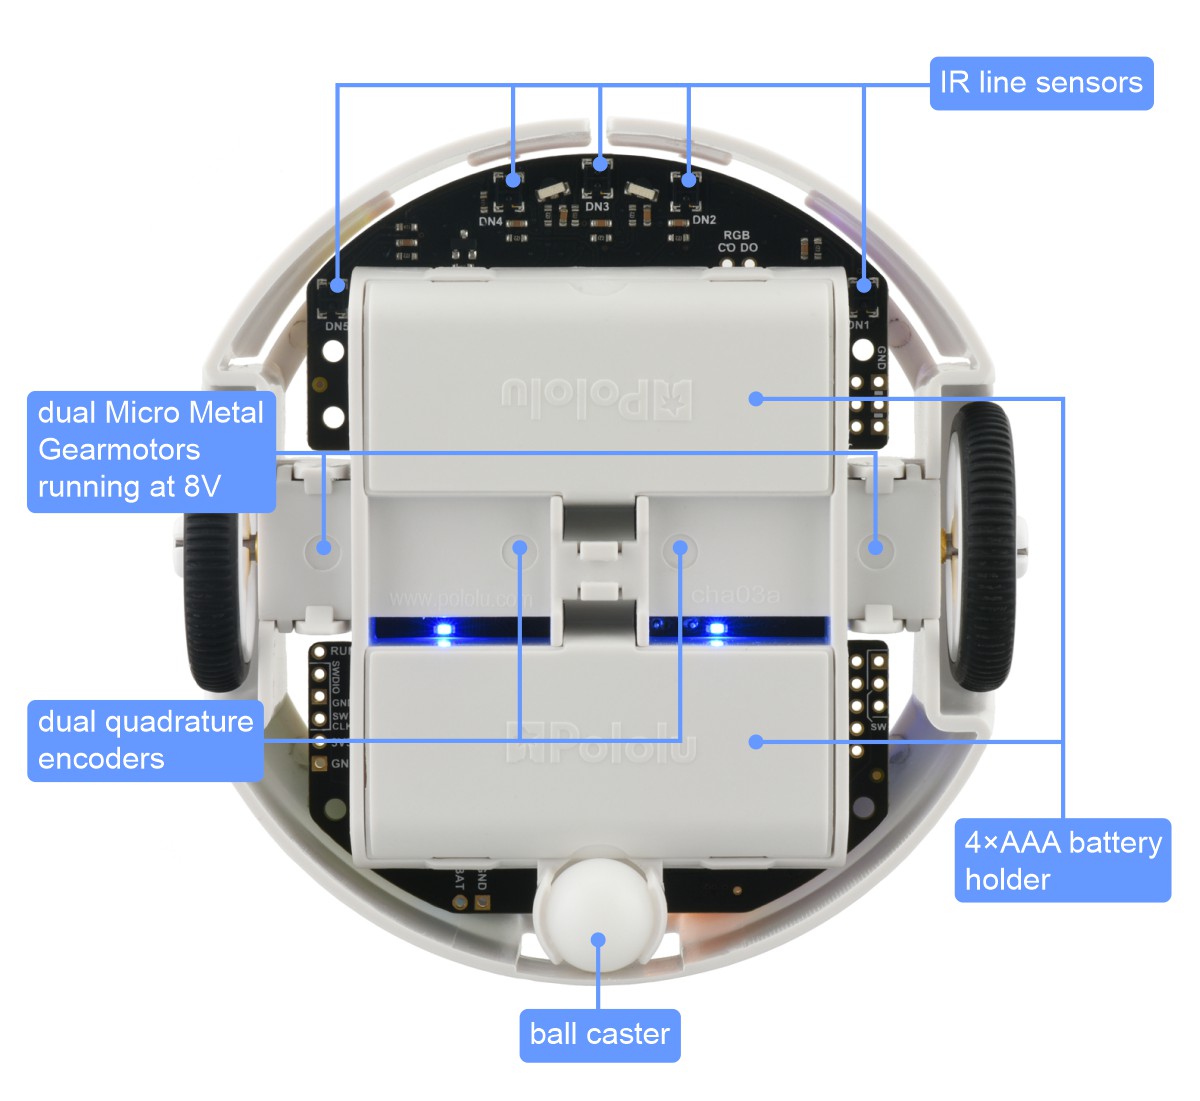
That brings us to the new 3pi+ 2040, powered by the Raspberry Pi RP2040 microcontroller (32-bit dual-core Arm Cortex-M0+) with 16 MB (128 Mbit) of flash memory. The robot ships preloaded with a MicroPython interpreter, so you can get started right away by plugging into its USB C port and editing the included example Python programs with your favorite text editor. No special programmers or programming software are required, and you can write MicroPython code from practically any desktop or mobile operating system as long as it has a text editor and the ability to copy files to a USB drive. For a basic Python IDE that lets you run code interactively, we are recommending the Mu editor. (See the User’s Guide for instructions on setting it up.)
|
|

There are many other programming environments and languages that you can use with the 3pi+. Since it shares the same RP2040 processor as the Raspberry Pi Pico, anything that works for the Pico should be usable on the 3pi+, including C, C++, and the Arduino environment. We already include some basic C examples in our example code repository, and we plan to write more examples and expand the software support for this robot. Do you have a favorite IDE that works with the Pico? Is there some language or system you’d like to run on the 3pi+?
 |
The menu of pre-installed demo programs on the 3pi+ 2040 Robot. |
|---|
Early adopter special: We are initially offering the 3pi+ 2040 Robot as a limited release intended for advanced customers who have had some experience with robotics or Raspberry Pi RP2040 programming (e.g. with a Raspberry Pi Pico). The initial release is available with 30:1 MP motors (the “Standard Edition”), either assembled for 38% off or in kit form for 50% off. Early adopter robots will generally need to be backordered as they are built to order; we expect to ship within a business day of ordering. The robot hardware is finalized so the only changes we expect for the full product release are in the initial firmware configuration and pre-installed example programs. Documentation will also continue to be developed as we release the robot to a wider customer base. Early adopters who publicly share their 3pi+ 2040 experiences will be eligible for an additional robot with an extra $25 discount.
Related products


New products: Motoron dual high-power motor controllers
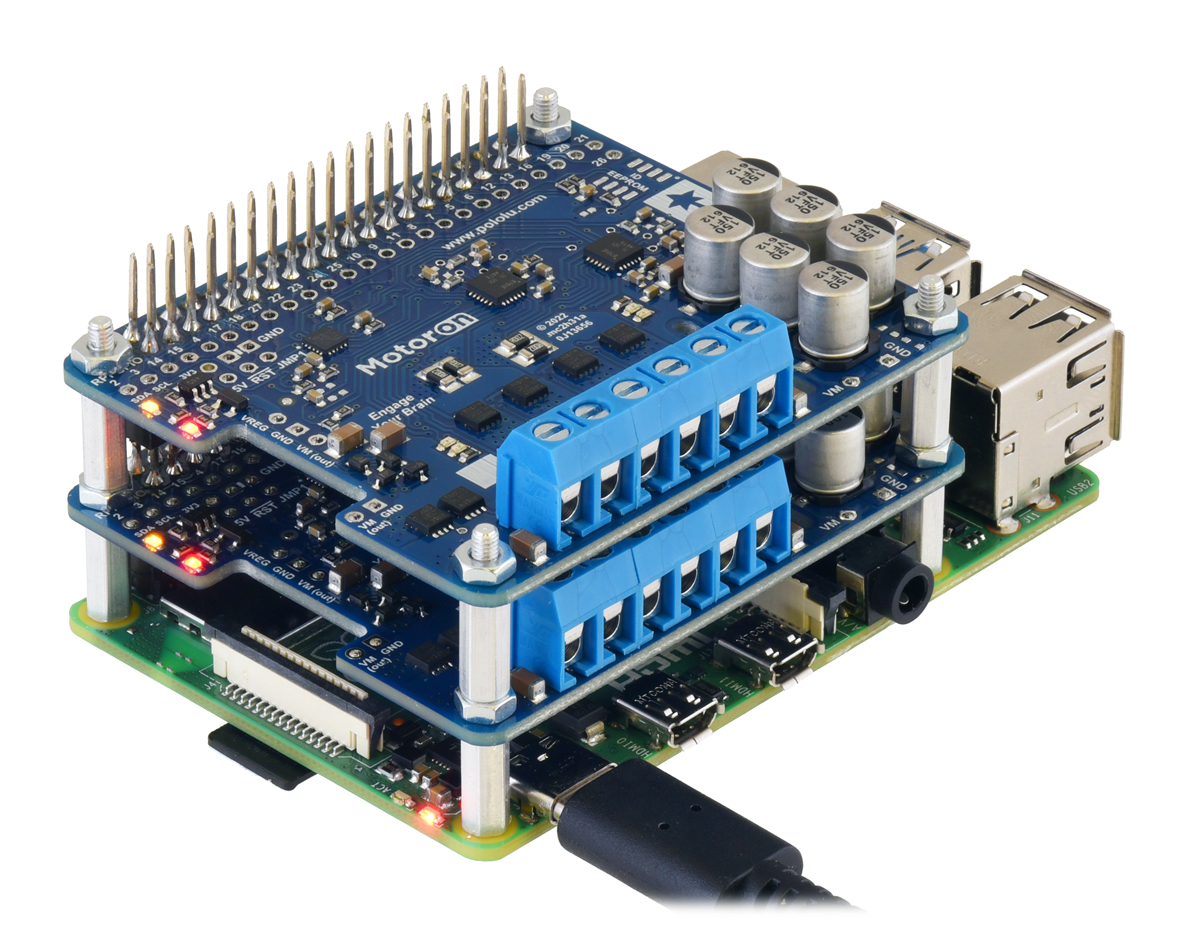 |
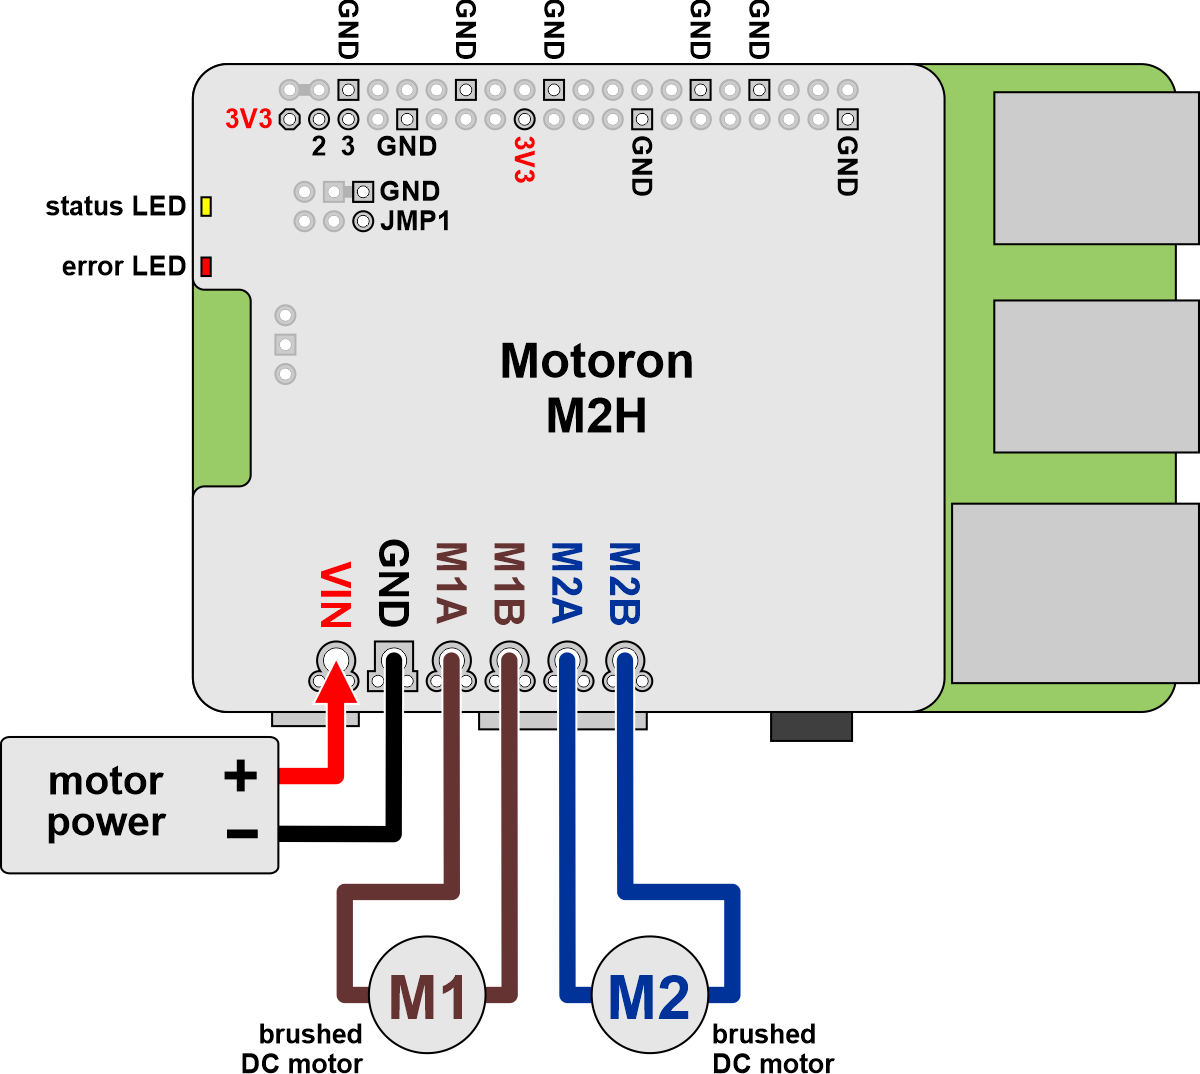
We’ve expanded our Motoron series of motor controllers with some dual high-power motor controllers: the Motoron M2S family for Arduino and Motoron M2H family for Raspberry Pi! These new Motorons have the same I²C interface as the M3S256 and M3H256, and though they only have two channels instead of the three on their smaller counterparts, they can drive much more powerful motors with up to 20 A of current at 30 V or 16 A at 40 V. There are four combinations of voltage and current ranges, available in versions designed to work as Arduino shields and as Raspberry Pi expansions.
|
|
These eight additions bring the Motoron family up to a total of ten members overall:
| Motoron Motor Controllers | |||||
|---|---|---|---|---|---|
 M3S256  M3H256 |
 M2S24v14  M2H24v14 |
 M2S24v16  M2H24v16 |
 M2S18v18  M2H18v18 |
 M2S18v20  M2H18v20 |
|
| Motor channels: | triple (3) | dual (2) | |||
| Max input voltage: |
48 V | 40 V1 | 30 V1 | ||
| Max nominal battery voltage: |
36 V | 28 V | 18 V | ||
| Max continuous current per channel: |
2 A | 14 A | 16 A | 18 A | 20 A |
| Available versions for Arduino: |
M3S256 | M2S24v14 | M2S24v16 | M2S18v18 | M2S18v20 |
| Available versions for Raspberry Pi: |
M3H256 | M2H24v14 | M2H24v16 | M2H18v18 | M2H18v20 |
| 1 Absolute maximum. | |||||
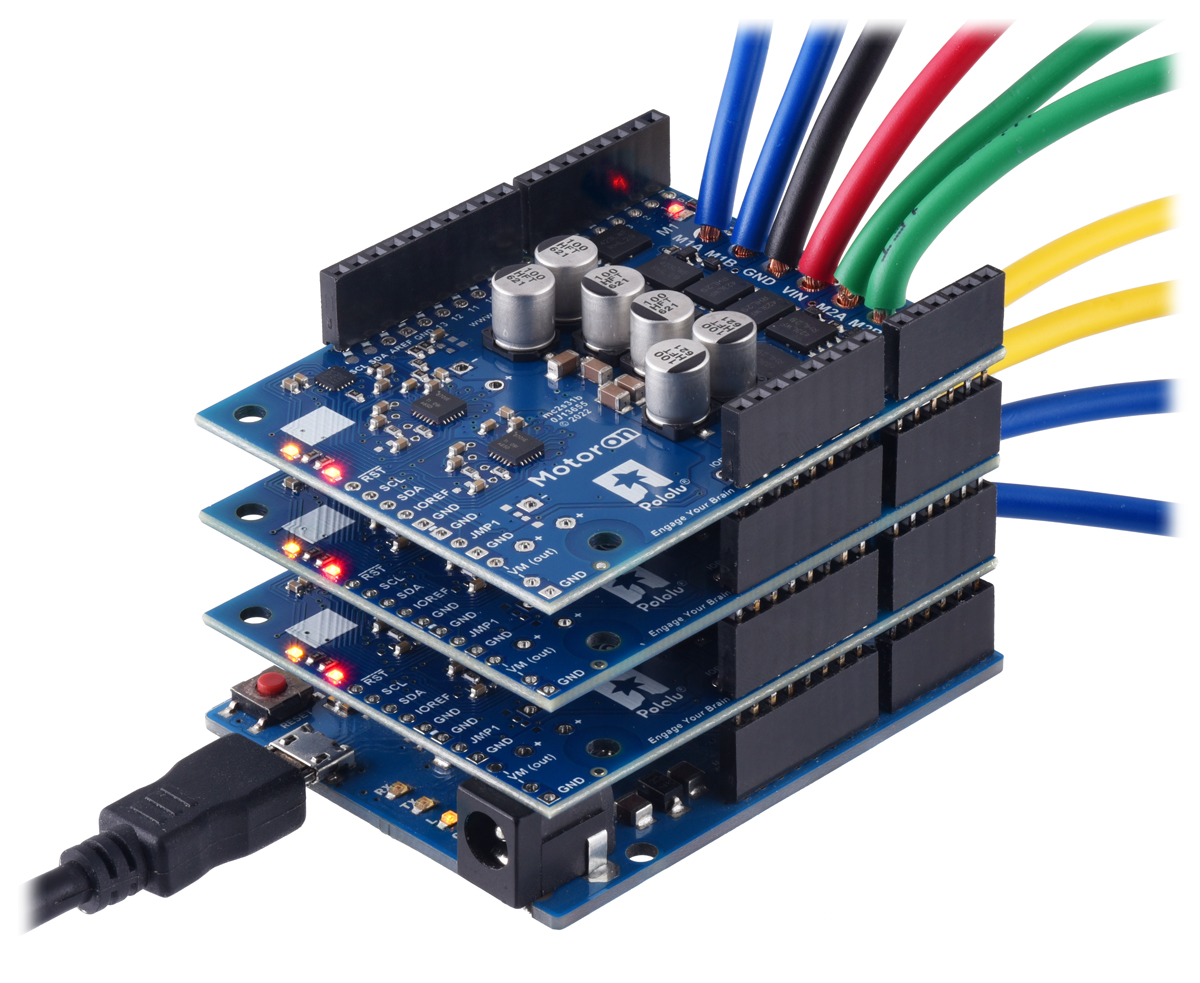
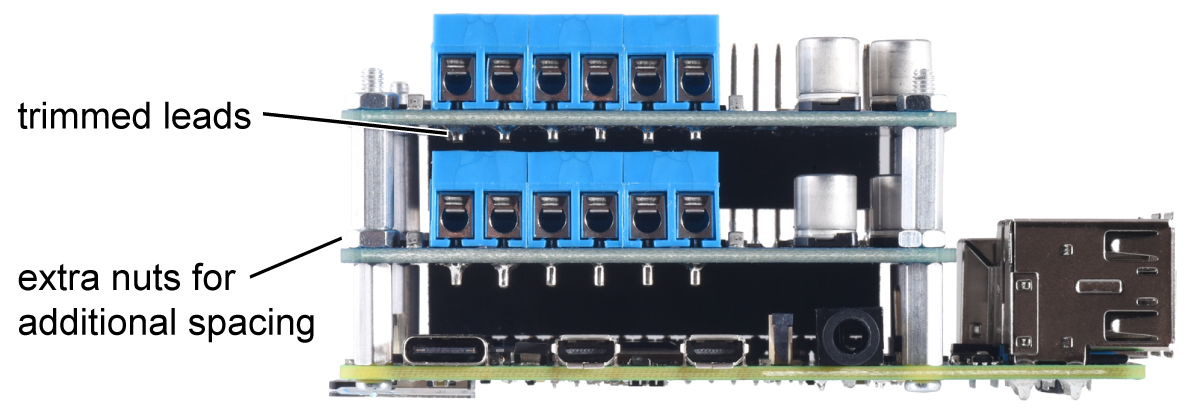
As with the smaller Motorons, the high-power versions can also be stacked and their addresses configured to allow many motors to be controlled with only one I²C bus. For a stack of M2S boards on an Arduino, we recommend soldering thick wires to the kit or board-only version because 5mm terminal blocks are tall enough that they would cause short circuits within the stack. However, the M2H boards can be set up to stack safely by trimming the terminal block leads and adding extra nuts to the standoffs for additional spacing.
|
|
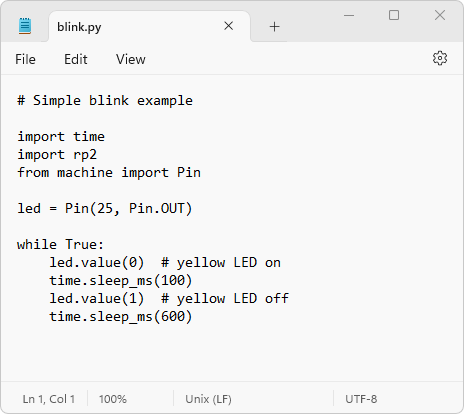
It’s also possible to stack different kinds of Motoron controllers so you can control different kinds of motors:
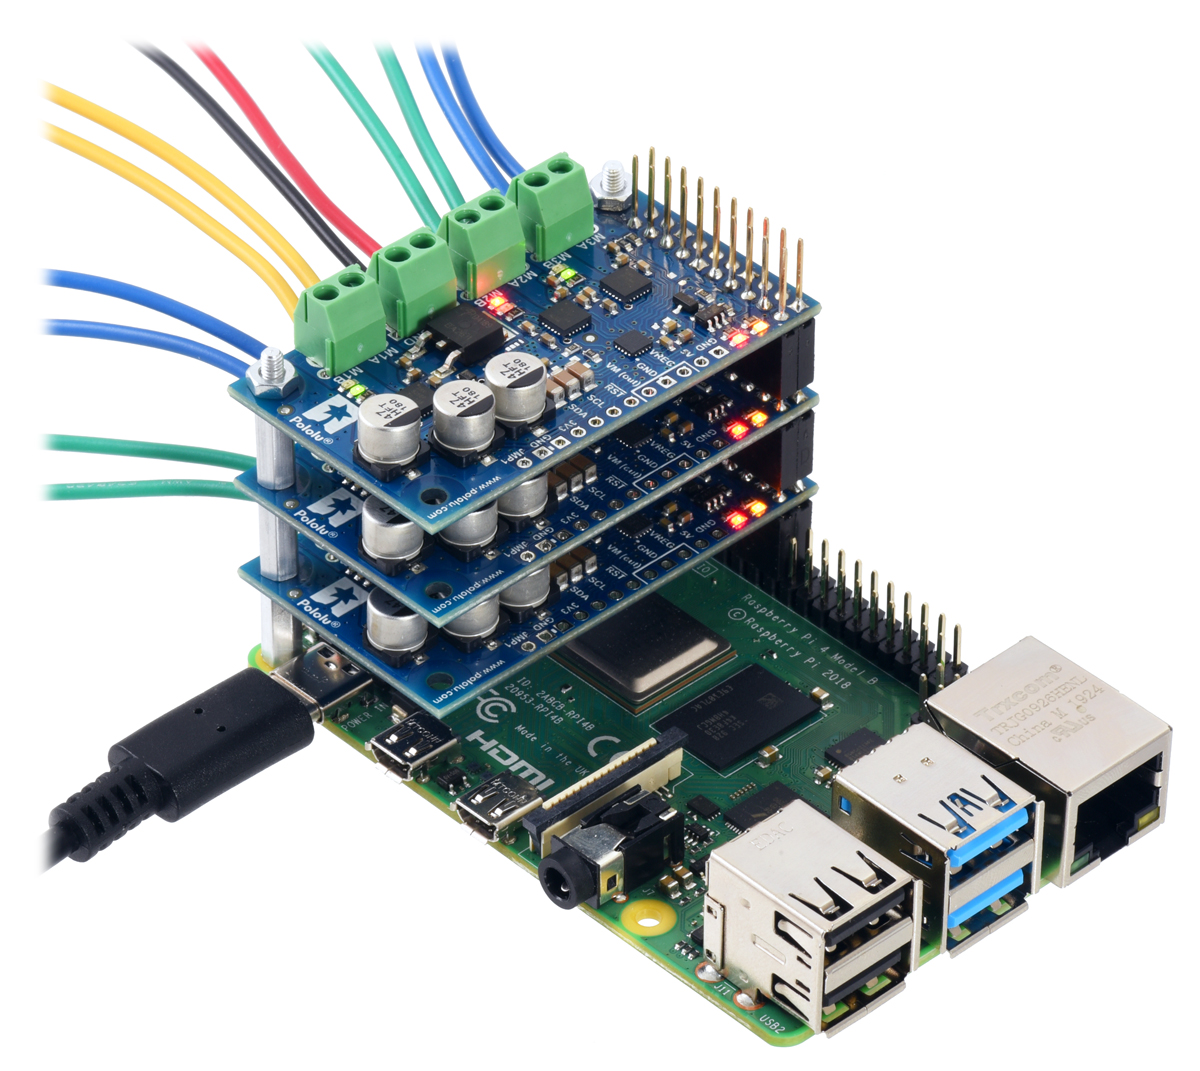
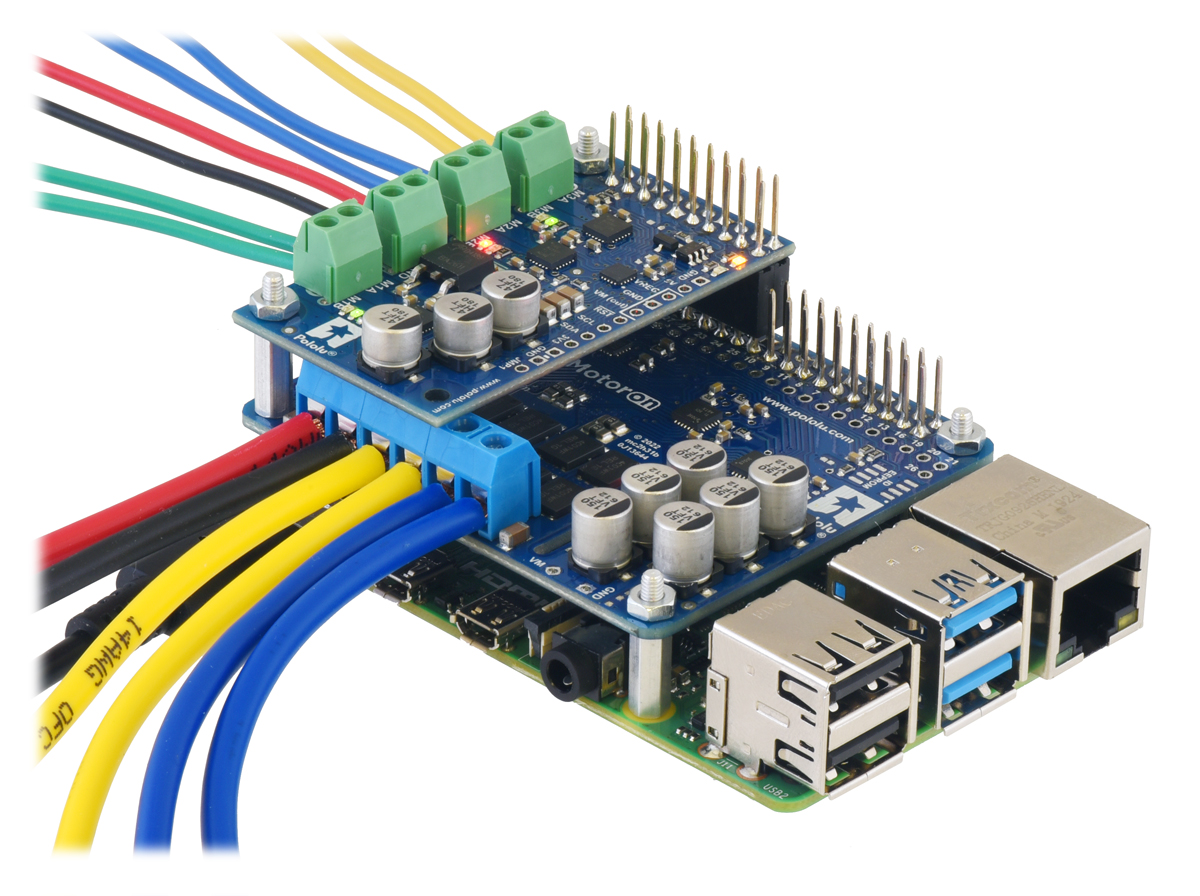 |
A Motoron M2H and a Motoron M3H256 being controlled by a Raspberry Pi, allowing for independent control of five motors. |
|---|
Unfortunately, the current state of the electronics supply chain is affecting how we’re making and selling these Motorons. In the past, when we released boards in multiple versions that have different MOSFET footprints, it was primarily to get us different power levels. Typically, we would make a less expensive one with smaller, lower-power MOSFETs and a more expensive one with bigger, higher-power MOSFETs. While we’re still doing this kind of thing with the M2S and M2H Motorons (the 24v14 and 18v18 use smaller MOSFETs and the 24v16 and 18v20 use bigger ones), in this case, it’s largely about maximizing parts options.
When we don’t know how many months (or years!) it will take for us to get more of a MOSFET, it’s hard to offer a product line where each model is totally dependent on one specific part. So we’ve chosen to make the different Motoron versions less distinct; the specified performance and prices are not as different between the small- and big-MOSFET versions since we want them to be viewed more interchangeably. Their performance specifications are also a little on the conservative side to give us more room to use different MOSFETs.
Even with those considerations, we still haven’t been able to get the parts to make as many of these new high-power Motorons as we want to. That’s why they are listed with a “Rationed” status in our store, with lower stock and higher pricing than we’d like. But we hope that as parts availability improves, we will eventually be able to ease up on those restrictions.
In fact, that just happened with the smaller M3S256 and M3H256: we received some long-awaited critical components that will let us make a lot more of those, so you should see more in stock soon, and we’ve already removed their Rationed status and lowered their prices!
Related products


New product: Motoron M3H256 Triple Motor Controller for Raspberry Pi
 |
Our Motoron M3H256 Triple Motor Controller for Raspberry Pi is now available! The M3H256 is a stackable I²C motor controller that can drive up to three brushed DC motors bidirectionally at voltages between 4.5 V and 48 V and continuous currents up to 2 A per channel. Unlike its M3S256 sibling, which is designed as a shield for an Arduino, the Motoron M3H256 is intended to stack on top of a Raspberry Pi (Model B+ or newer), similar to a HAT (Hardware Attached on Top). With an I²C address that can be configured uniquely for each board, a stack of Motorons let you control many motors at once without taking up lots of GPIO pins and PWM outputs from the Pi.
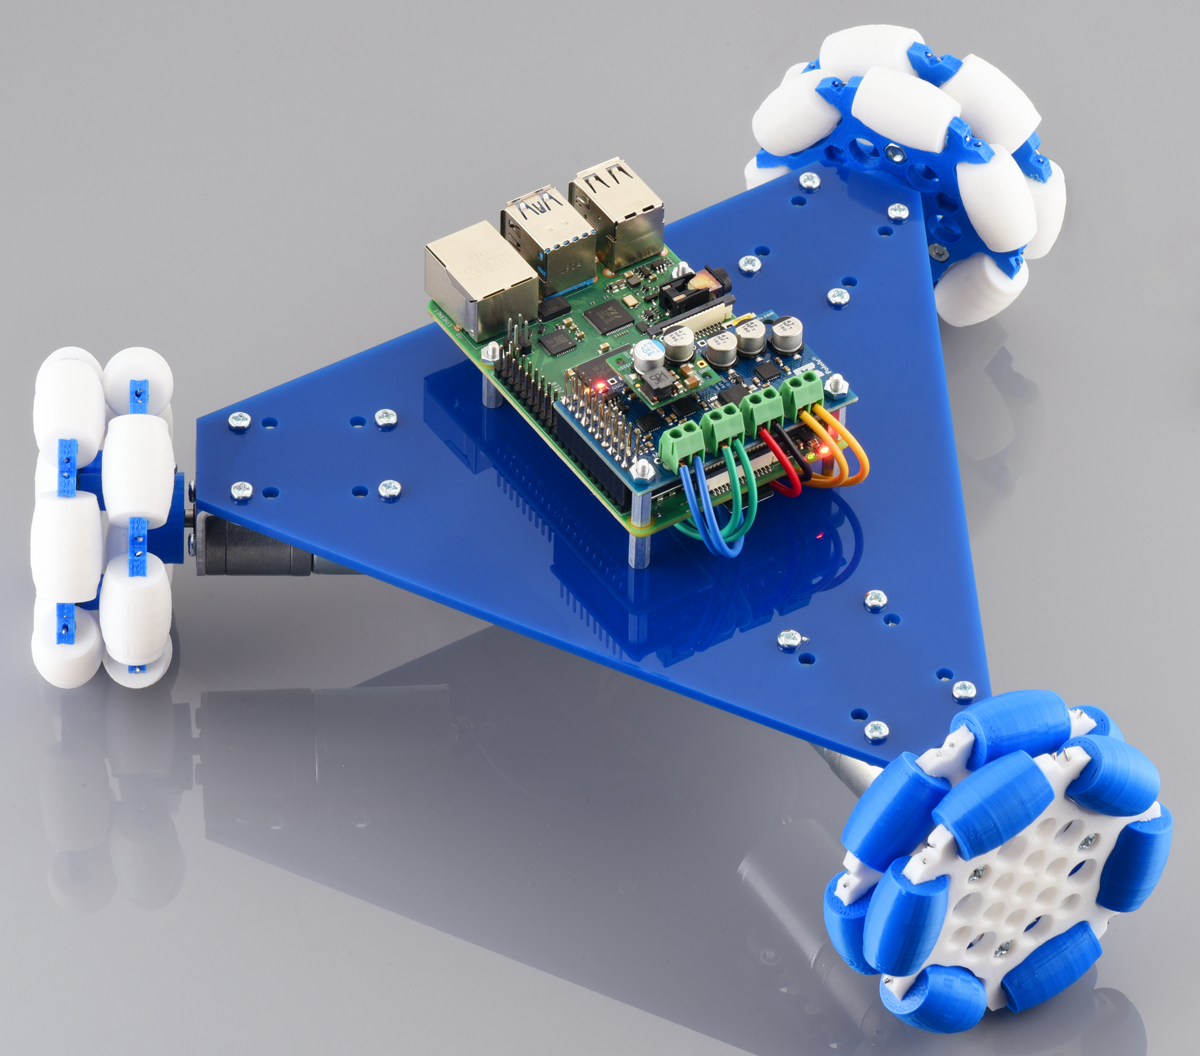 |
A robot with three omni wheels and motors controlled by a Raspberry Pi with a Motoron M3H256 Triple Motor Controller. A D24V22F5 regulator powers the Raspberry Pi. |
|---|
If you decide not to plug it into a Raspberry Pi, the Motoron M3H256 can also be used in a breadboard or another custom setup with your own wiring:
|
|

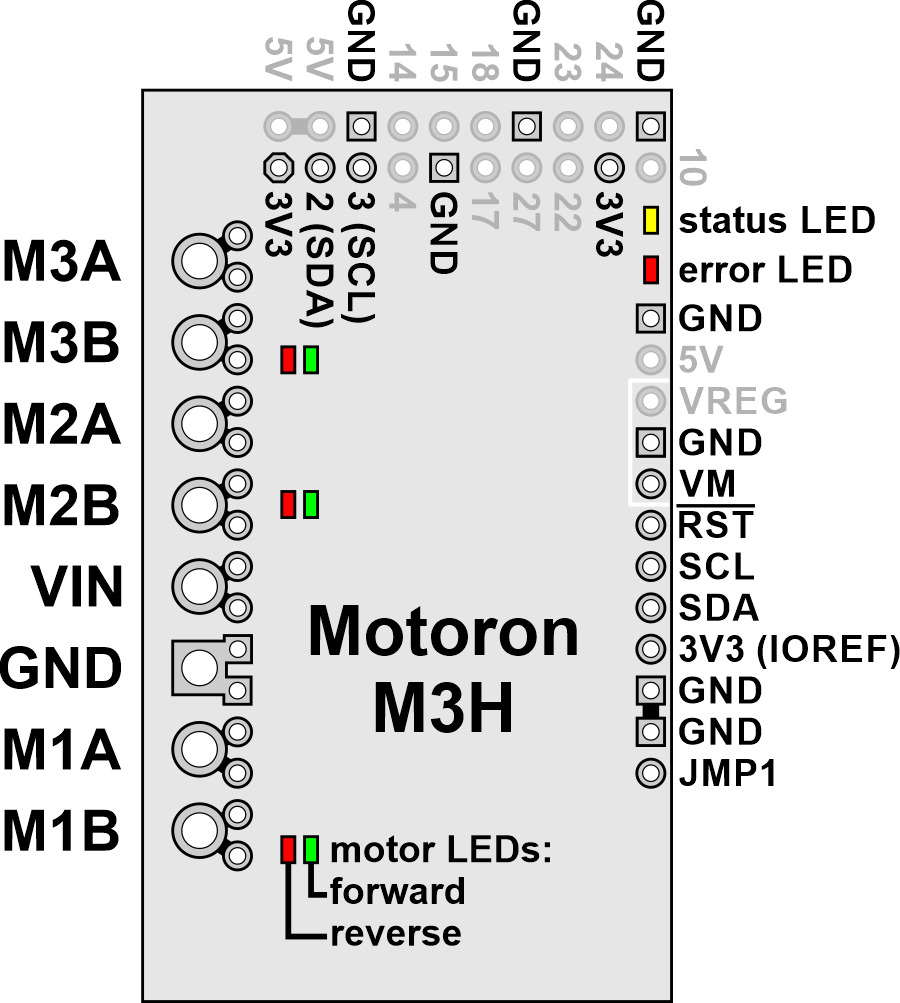
The Motoron M3H256 is available in three different configurations similar to its Arduino shield counterpart: you can get one fully assembled with stackable headers and terminal blocks already soldered, a kit that lets you pick which of the included connectors to solder in yourself, or the board alone if you already have or don’t need connectors and standoffs.
And to help you get started using the Motoron with a Raspberry Pi, we have a Python library you can use to configure the M3H256 and send it commands:
import motoron

mc1 = motoron.MotoronI2C(address=17)
mc2 = motoron.MotoronI2C(address=18)

# Clear reset flags to allow Motorons to run
mc1.clear_reset_flag()
mc2.clear_reset_flag()

# Set up acceleration limits for Motoron #1
mc1.set_max_acceleration(1, 200)
mc1.set_max_acceleration(2, 200)

# Set up acceleration and deceleration limits for Motoron #2
mc2.set_max_acceleration(1, 75)
mc2.set_max_deceleration(1, 250)
mc2.set_max_acceleration(2, 80)
mc2.set_max_deceleration(2, 300)
mc2.set_max_acceleration(3, 75)
mc2.set_max_deceleration(3, 250)

# Drive the motors

mc1.set_speed(1, -100)
mc1.set_speed(2, 100)

mc2.set_speed(1, 300)
mc2.set_speed(2, 200)
mc2.set_speed(3, 50)
We’re sure there are plenty of applications where the convenience and scalability of Motorons will be useful. What kind of projects can you think of that would make good use of one (or several)?
For more information about the Motoron M3H256, see the product pages and the comprehensive user’s guide.
Related products


New product: Raspberry Pi 3 Model B+
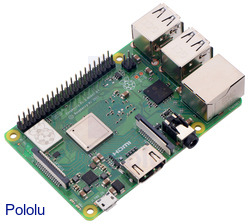
We are now carrying the Raspberry Pi 3 Model B+. The Raspberry Pi is a popular credit card-sized computer that can run ARM Linux distributions. The Raspberry Pi 3 Model B+ has many performance improvements over the Pi 3 Model B including a faster CPU clock speed (1.4 GHz vs 1.2 GHz), increased Ethernet throughput, and dual-band WiFi. It also supports Power over Ethernet with a Power over Ethernet HAT. Continued…
New Product: Dual TB9051FTG Motor Driver for Raspberry Pi
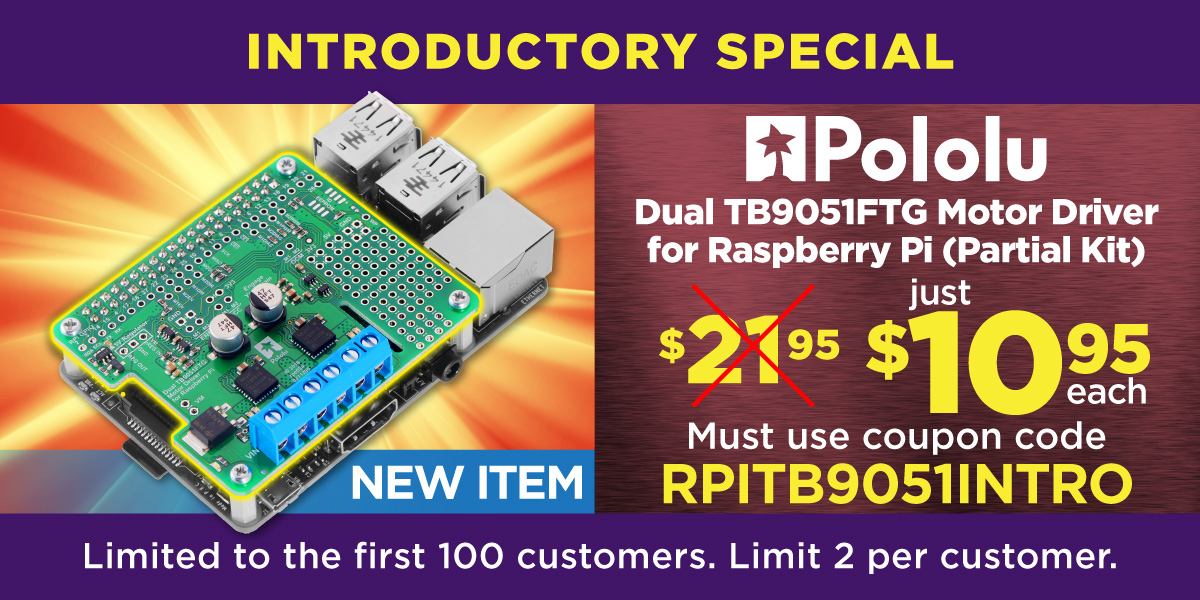
I am excited to share the second Pololu product for which I routed the PCB, the Dual TB9051FTG Motor Driver for Raspberry Pi. This board complements the TB9051FTG Single Brushed DC Motor Driver Carrier and the recently announced Dual TB9051FTG Motor Driver Shield for Arduino by making it easy to control two motors with a Raspberry Pi (Model B+ or newer).
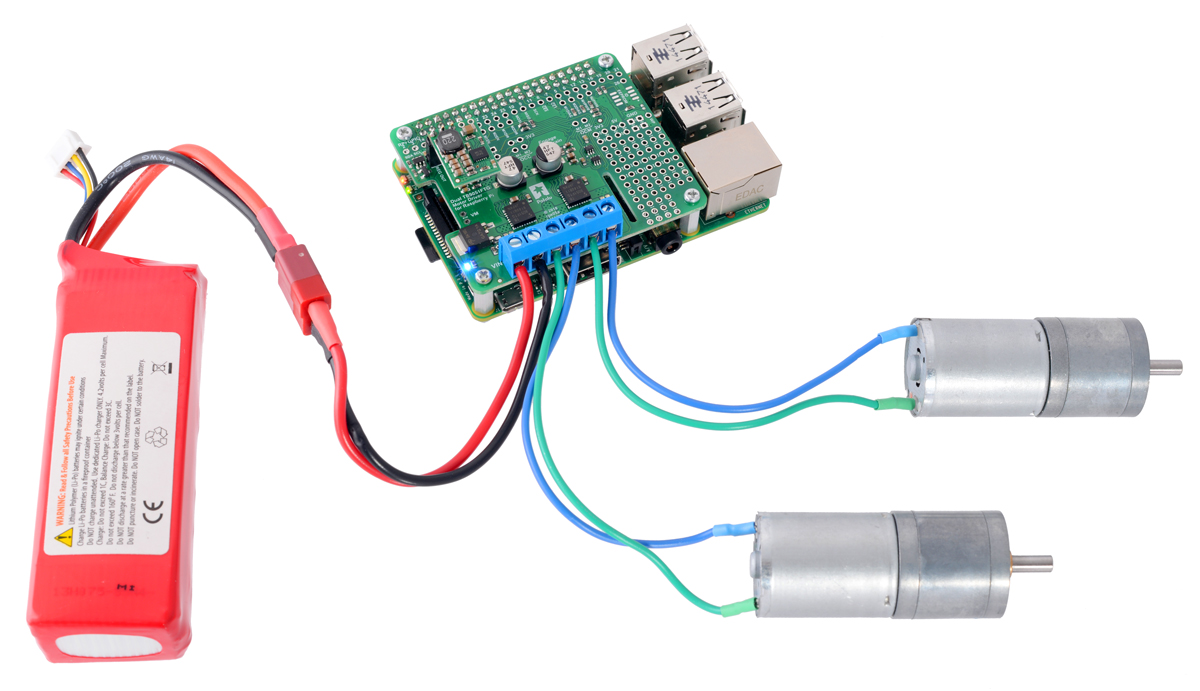
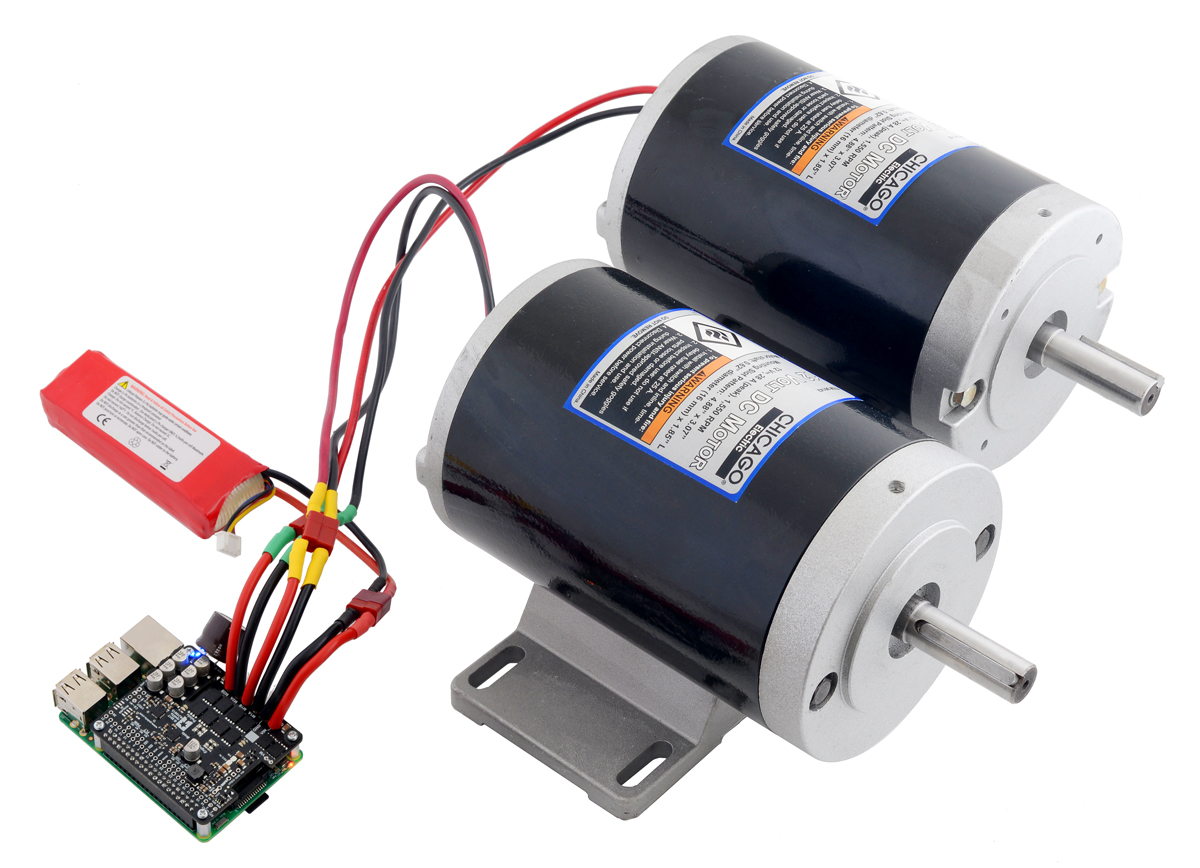
The TB9051FTG can deliver a few amps across a wide operating voltage (4.5 to 28 V), which makes this expansion board ideal for controlling two small or medium size motors in your Raspberry Pi project. You can optionally connect a voltage regulator, like a D24V10F5 or D24V22F5 step down regulator, to power the Raspberry Pi with your motor power supply. The board also provides a prototyping area to help you construct clean custom circuits without the need for additional prototyping PCBs beyond the footprint of your Raspberry Pi.
 |
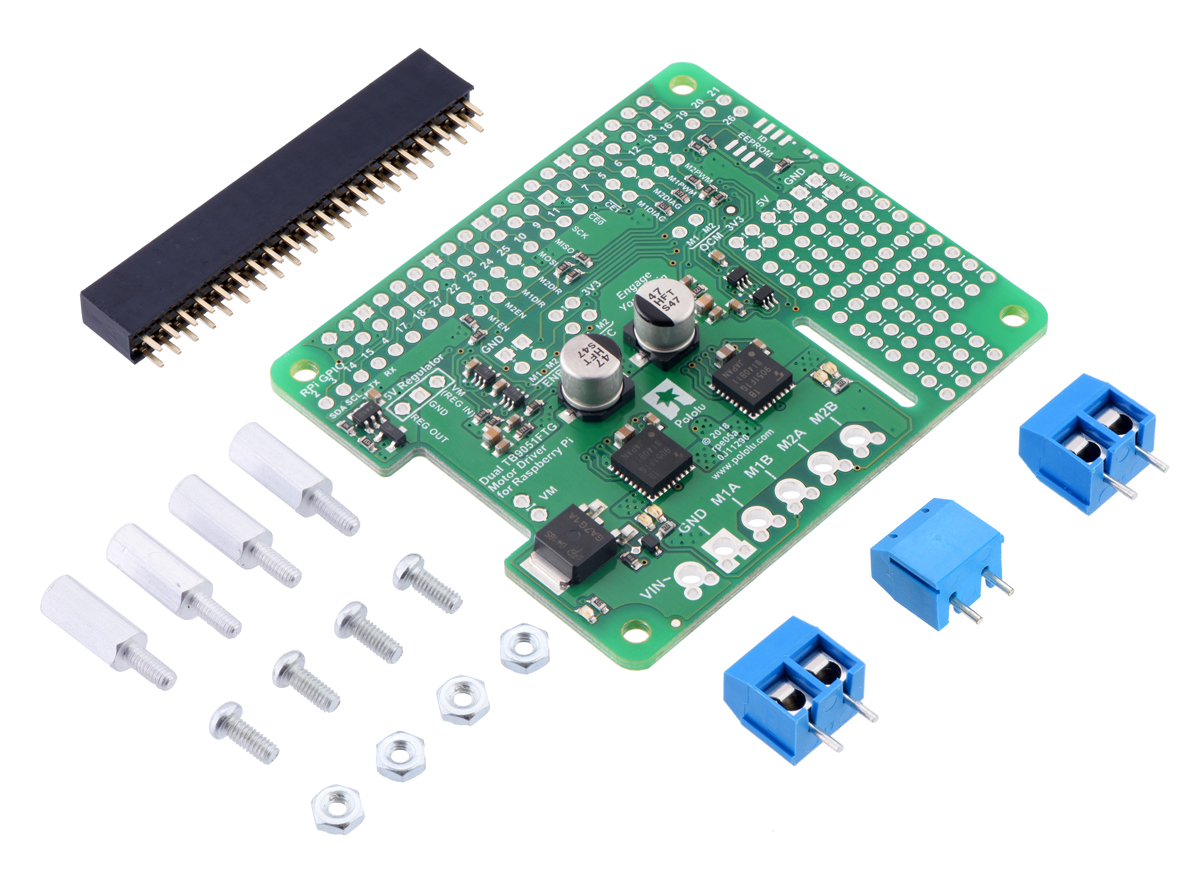
The Dual TB9051FTG Motor Driver for Raspberry Pi is available in two versions:
- a partial kit, with connectors included but not soldered in
- fully assembled, with the female header and terminal blocks soldered to the board
The board adheres to the Raspberry Pi HAT (Hardware Attached on Top) mechanical specification, although it does not conform to the full HAT specifications due to the lack of an ID EEPROM. (A footprint for adding your own EEPROM is available for applications where one would be useful.)
|
|

With the addition of this product, we now have eight Raspberry Pi motor driver expansion boards for you to choose from. To control more powerful motors, we offer various high-power motor drivers for Raspberry Pi. If you don’t need all the power provided by the TB9051FTG, consider our small and inexpensive DRV8835 Dual Motor Driver for Raspberry Pi or the dual MAX14870 motor driver expansion board (the first board I routed).
|
|

We have an introductory discount to go with this new product announcement. The first 100 customers to use coupon code RPITB9051INTRO can get up to two units for just $10.95 each. Note that this introductory offer applies only to the units without connectors soldered in. The introductory coupons for the single TB9051FTG carrier, the dual TB9051FTG Arduino shield, and some other products introduced this year are still available; you can see all the coupons available on our specials page.
Related products


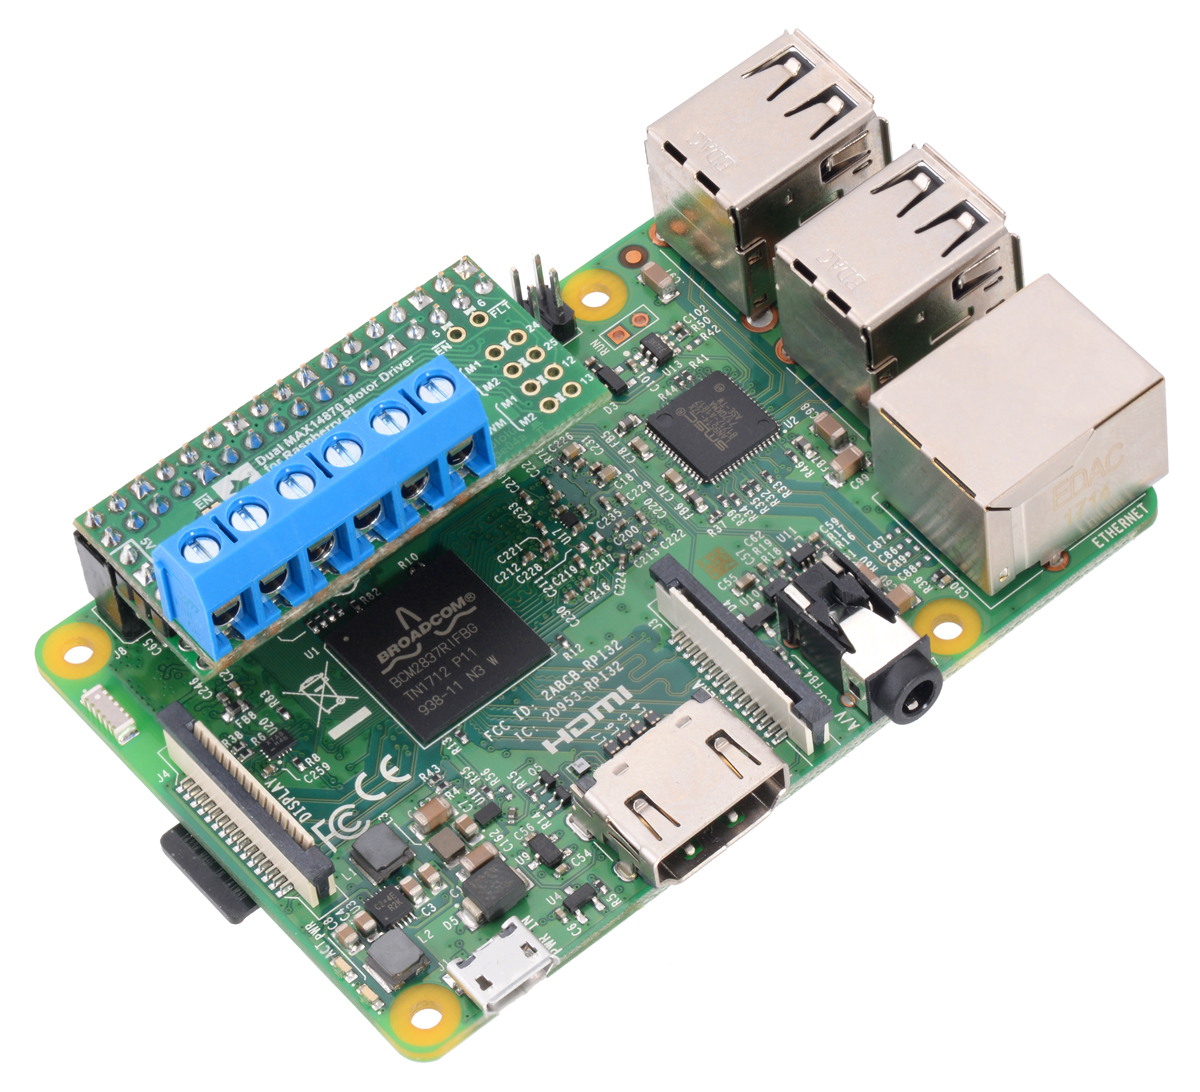
New products: Dual MAX14870 Motor Drivers for Arduino and Raspberry Pi
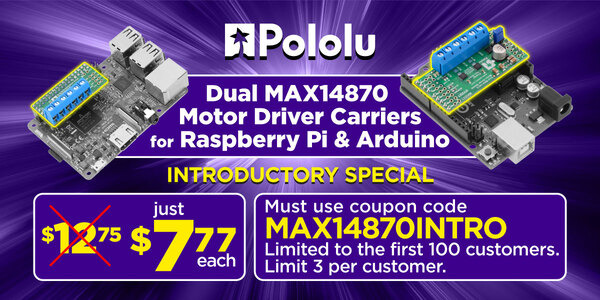
For my birthday, I am excited to share two new products to help get your projects moving: dual motor driver boards for Arduino and for Raspberry Pi based on Maxim MAX14870 drivers, which on these boards (without additional cooling) can power motors with a continuous 1.7 A (2.5 A peak) from a voltage source anywhere from 4.5 V to 36 V. This makes the driver ideal for powering a wide range of motors including our high power micro metal gearmotors, and our 12 V 20D mm metal gearmotors. We like the MAX14870 so much that already we make a single driver carrier for it, and we use it on our A-Star 32U4 Robot Controller SV. These new boards make it easy to control two motors using the MAX14870 with an Arduino or Raspberry Pi.
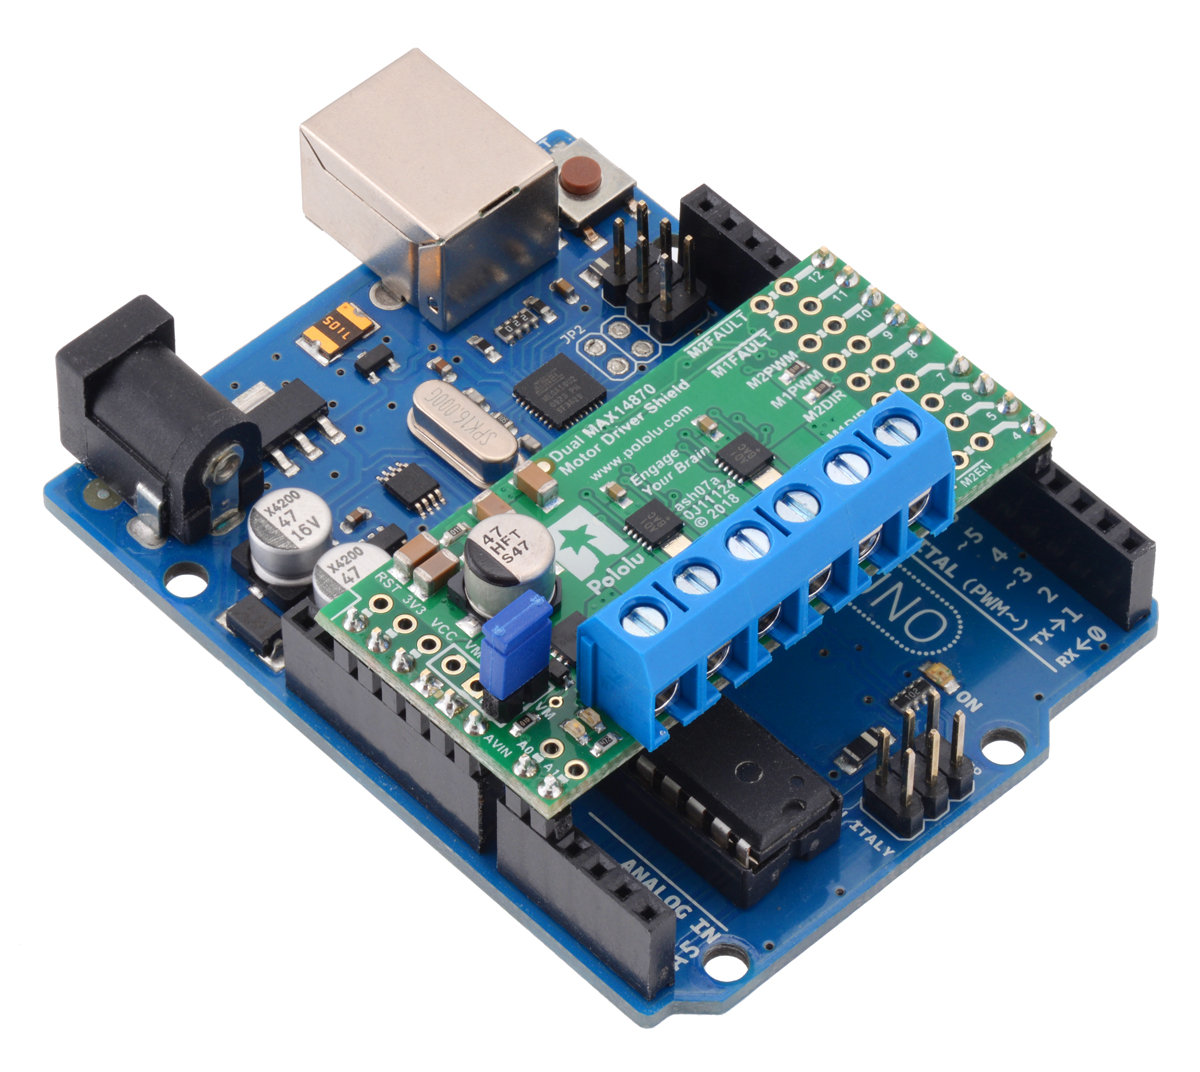 |
The Dual MAX14870 Motor Driver Shield for Arduino is designed to plug directly into an Arduino or another microcontroller board with the Arduino form factor. It connects the Arduino I/O pins to the two-pin speed/direction interfaces as well as the fault output pins, and our open-source library is available to help you get started. The shield can be set up to power your Arduino device from your motor power supply, which is especially helpful if you are using an Arduino or compatible device with an operating voltage similar to that of the MAX14870, such as our A-Star 32U4 Prime SV. Additionally, the board can be customized to use the advanced features of the MAX14870 drivers or change the pin mappings.
The Dual MAX14870 Motor Driver for Raspberry Pi has many of the same features as the Arduino version, but it is designed to plug into the GPIO header on a compatible Raspberry Pi (Model B+ or newer), including the Pi 3 Model B and Model A+. We provide an open-source Python library to make it easy to interface with the board. This board also has a location to connect a step-down 5 V regulator to power the Raspberry Pi from your motor’s power supply.
|
|

I am really excited about these boards because the Raspberry Pi expansion board is the first PCB I ever designed, and the Arduino shield was designed by my friend David S. Both of us are engineering students at the University of Nevada, Las Vegas who work at Pololu to complement our studies. It has been a great experience for us to learn how to design these products from the development engineers here at Pololu. Plus, getting to share these products for the first time with you is a fun way to celebrate my birthday!
As usual for our new product releases this year, we’re offering an extra introductory discount: the first 100 customers to use coupon code MAX14870INTRO can get any mix of up to 3 of these boards for $7.77 each. (Click to add the coupon code to your cart .) Note that this introductory offer applies only to the units without connectors soldered in.
Related products


We're having a Pi Day sale, and it starts tonight!
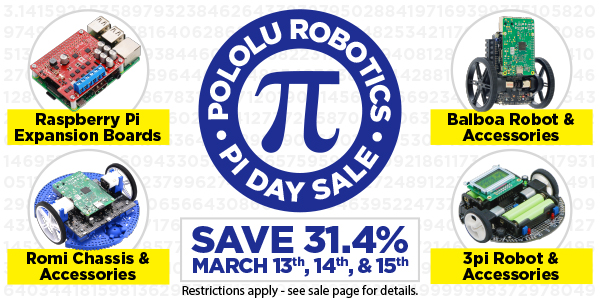
Pi Day is nearly upon us, and to celebrate, we are discounting a variety of exciting products that can be loosely associated with “Pi”. The sale starts tonight at 8:36 PM PDT and runs through the end of the 15th. And in case you are wondering about the strange start time, that makes the sale 3.14159 days long in yet another tribute to this wonderful irrational number (if it bothers you that 3.14159 is not irrational, you can pretend that the sale lasts exactly π days).
Check out the sale page for more information (and check out piday.org for more information on Pi Day)!
Building a Raspberry Pi robot with the Romi chassis
This tutorial shows how to build a basic Raspberry Pi robot with the Romi chassis and the Romi 32U4 Control Board, our Arduino-compatible microcontroller board designed specifically for the Romi. With this setup, the powerful Raspberry Pi can take care of high-level tasks like motion planning, video processing, and network communication, while the Romi 32U4 Control Board takes care of low-level tasks that the Pi is incapable of, such as motor control and sensing. Continued…
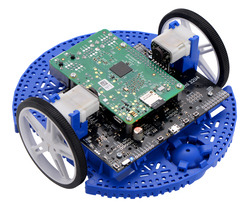
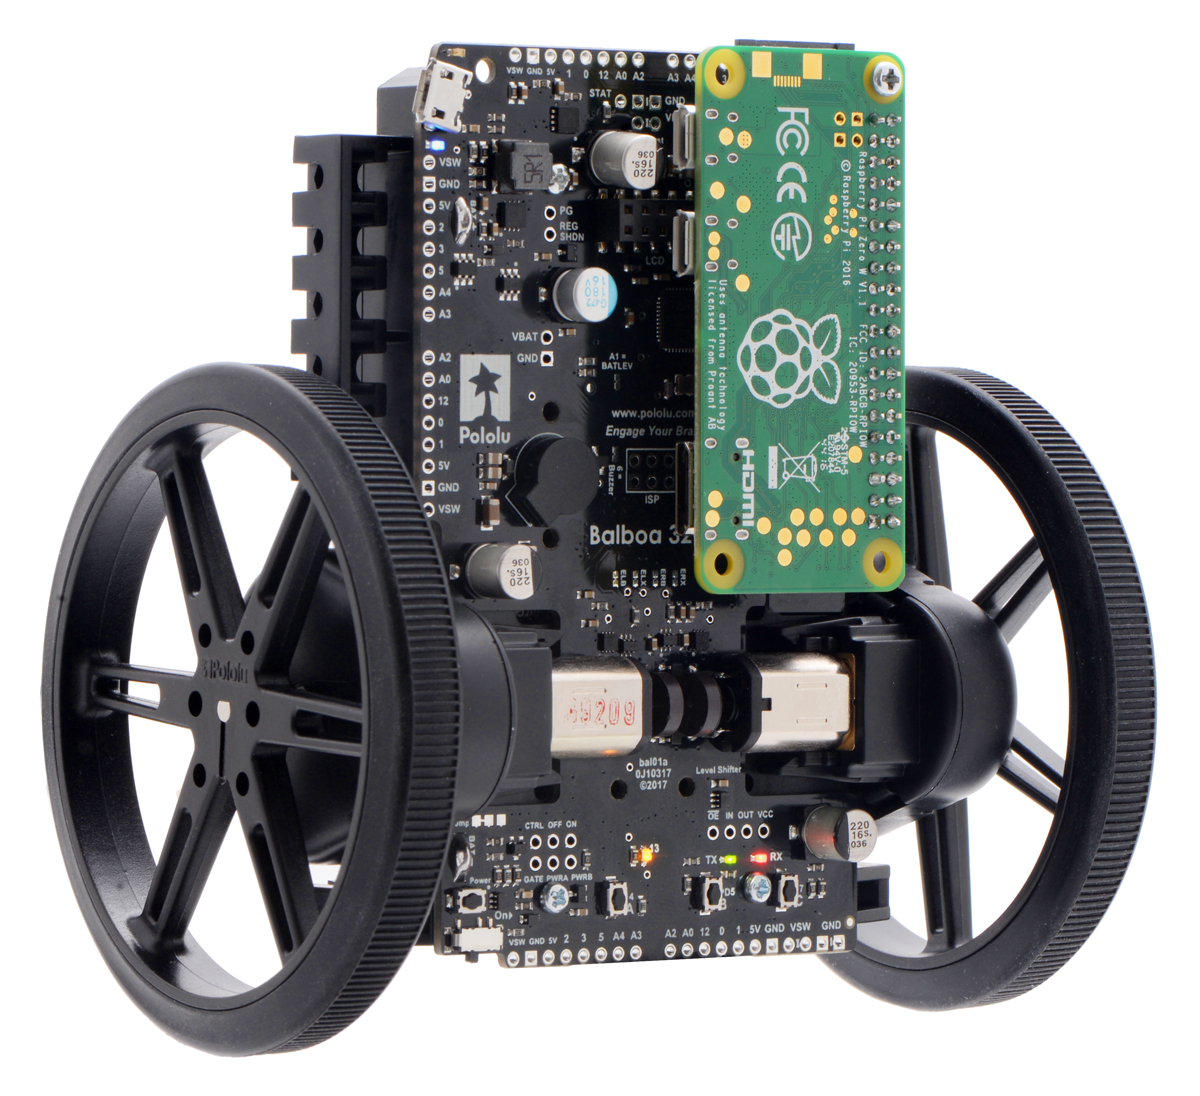
Balboa is here!
 |
I am excited to announce the release of the Balboa robot! The Balboa is a two-wheeled balancing robot platform that is small enough to tempt you to run it on a desktop, but it’s quick enough that you should probably stick to bigger, softer surfaces. Or at least put a safety net or foam pit around your desk. Here is a short video showing it kicking up into balancing position and driving around:
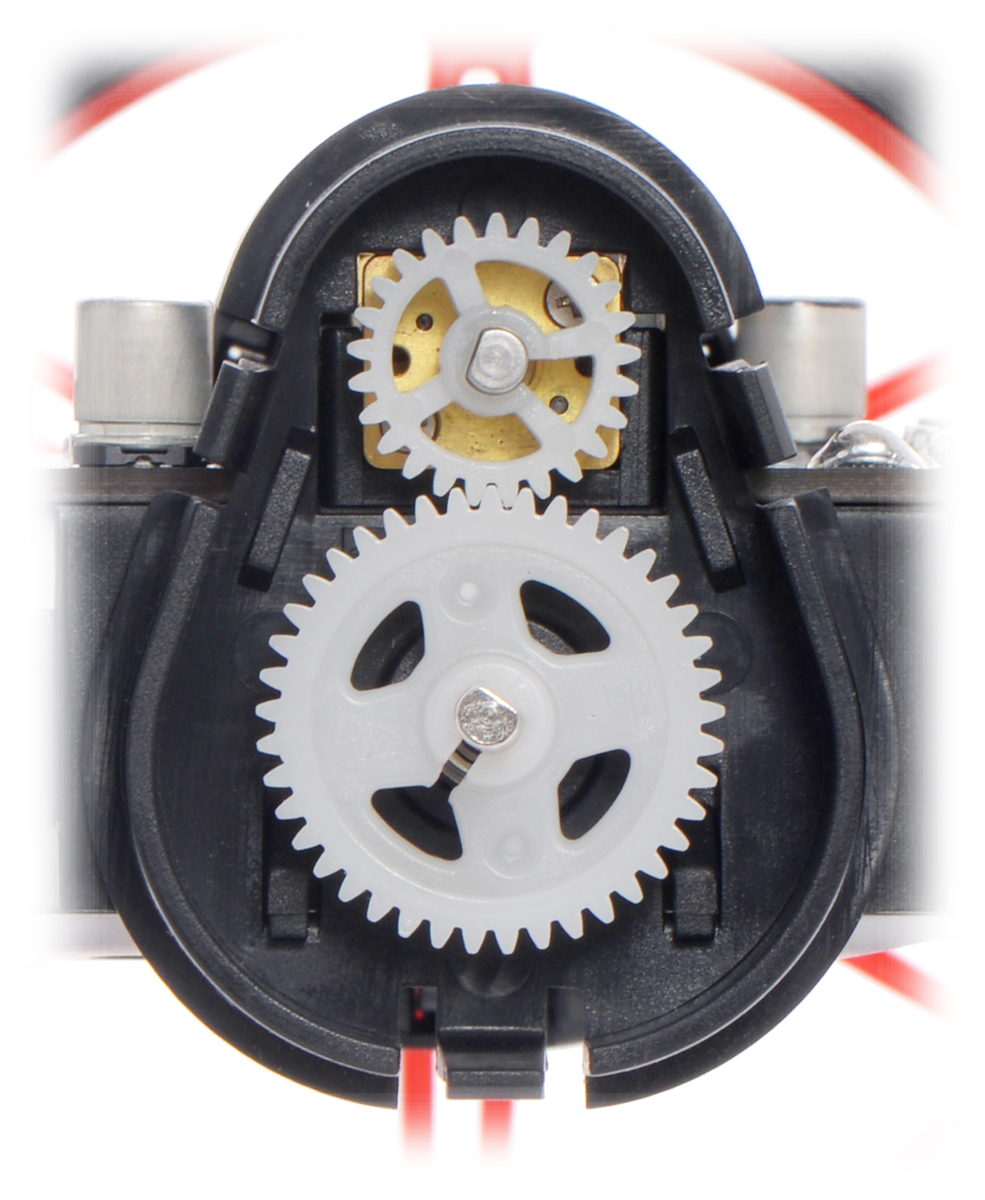 |
A look inside the external gearbox on the Balboa 32U4 Balancing Robot. |
|---|
One of our main goals in designing our robots is to make them complete and engaging on their own while making them open and expandable enough for all kinds of projects. We also don’t want them all to be the same. Most of the Balboa robots in our pictures have 80 mm wheels, but the chassis can also work with our 90 mm wheels (and to a lesser, barely practical extent, our 70 mm wheels). Because the chassis is made for our micro metal gearmotors, you have a few options for gear ratios as with our Zumo sumo robots, but what’s really exciting about the Balboa design is that there is an extra stage of gear reduction for which you get five different options (all included, and you can easily change the gear ratio from whatever you initially choose). The design also allows the drive wheels to be supported on ball bearings, reducing the stress on the micro metal gearmotor output shafts.
The Balboa chassis has a built-in battery holder for six AA cells, which typically give you several hours of run time, even if you add some extra power-hungry electronics like a Raspberry Pi.
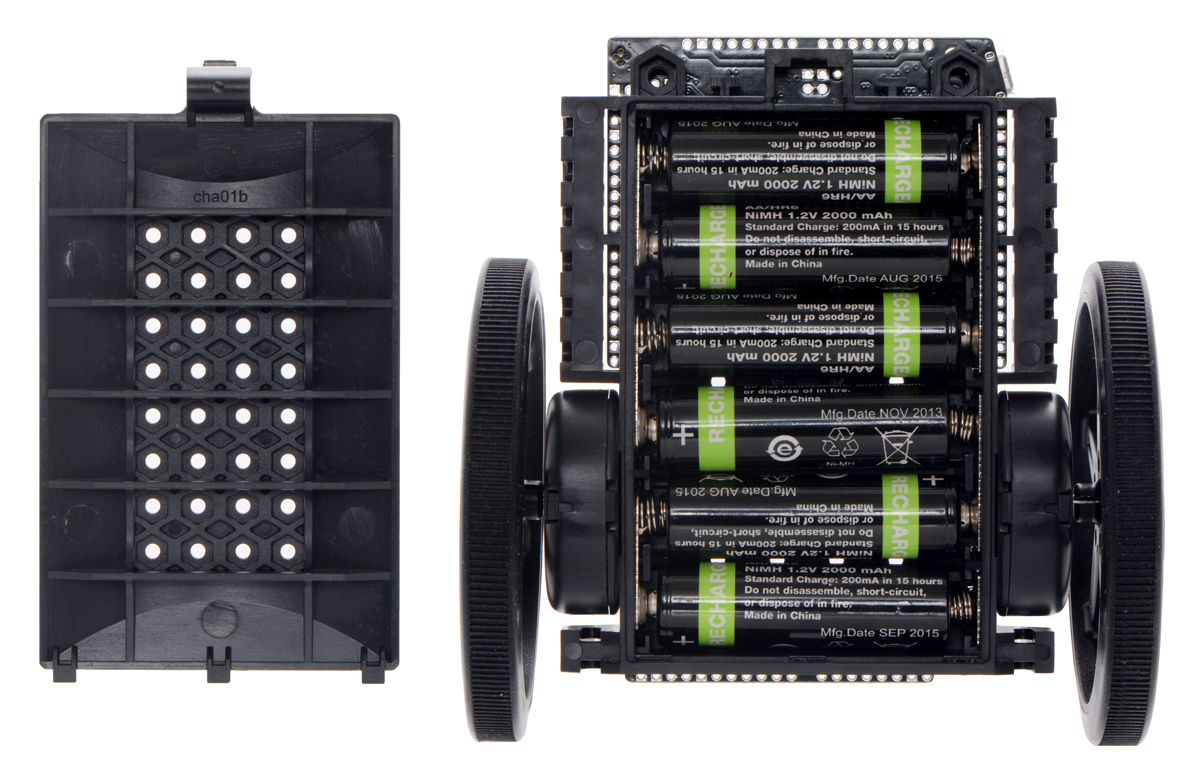 |
Balboa 32U4 Balancing Robot with battery cover removed. |
|---|
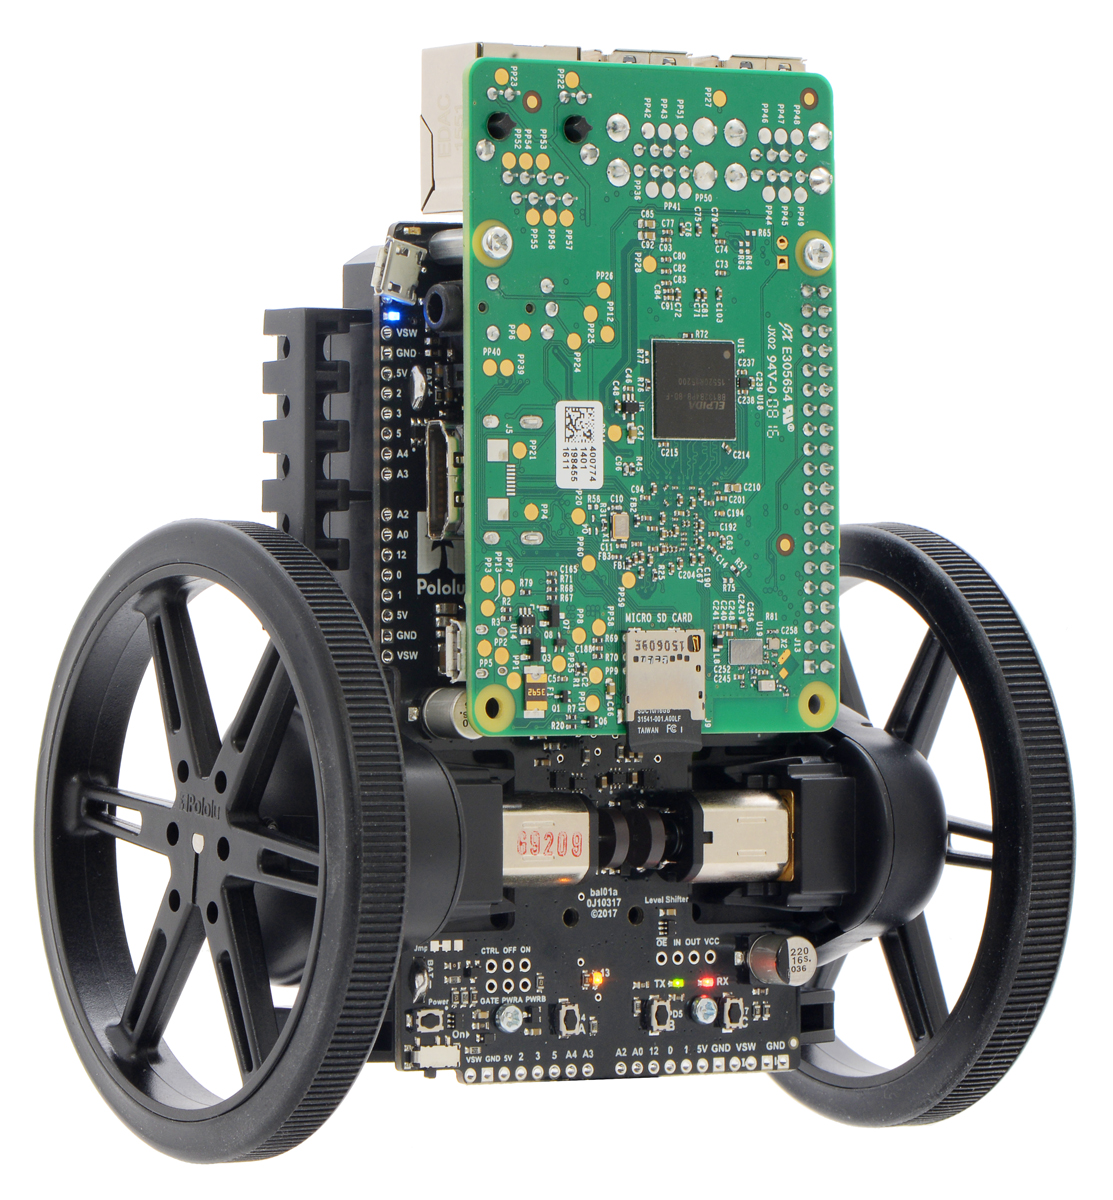
The main microcontroller is an Arduino-compatible ATmega32U4, which is powerful enough to read the on-board IMU sensors and encoders and to control the motors to balance the robot; it’s also great for introductory projects like line following or reading an RC receiver to make a radio-control balancing robot. For advanced projects, the Balboa is ready for you to add a Raspberry Pi computer to perform high-level algorithms while the ATmega32U4 microcontroller takes care of low-level tasks like motor control.
|
|
|

We will be adding more content to the Balboa’s product page and user’s guide, and we will have more blog posts about the Balboa robot. For today, we’ll end with some slow-motion footage of Balboa popping up on its own and then recovering when Paul knocks it around a bit:
Related products

Web-based control of a telescope using Raspberry Pi
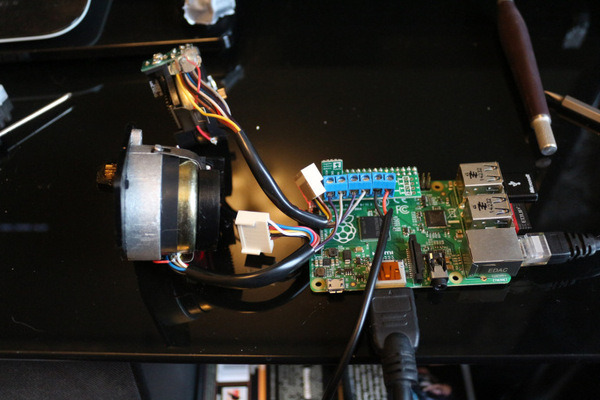 |
@MarcisShadow is working on a project using a Raspberry Pi with a Pololu DRV8835 Dual Motor Driver Kit for Raspberry Pi to control a Celestron NexStar GoTo Mount, allowing web-based control of a telescope. He also uses a Pololu 5V Step-Up/Step-Down Voltage Regulator S7V7F5 connected to the motor driver to power the Raspberry Pi from the motor power supply.
The project is being documented in a multi-part series on DirtyAstro.com. Part 1 covers the electronics that come with the telescope mount, part 2 is about assembling and testing the DRV8835 driver kit and motors, part 3 tackles setting up the Raspberry Pi and using an SSH client (PuTTY) to connect to it remotely via a PC, and part 4 is about getting Node-Red running to program the Raspberry Pi graphically using a web interface from any machine on the network.
He is not finished with the project, but I have a couple of suggestions for him or anyone doing something similar: First, since his 12 V supply exceeds the maximum operating voltage of both the motor driver (11 V) and the regulator (11.8 V), I would recommend using different ones. Keep in mind that “wall-wart” DC power supplies, especially older transformer-based ones, can have a voltage significantly higher than the rated voltage. Second, a board running a full operating system is usually not great for timing-sensitive operations like counting encoder ticks. If it can’t keep up with the pulse rate, I would recommend using a secondary microcontroller for the encoders. One possibility would be to use the A-Star 32U4 Robot Controller SV with Raspberry Pi Bridge, which incorporates a more appropriate 5.5 V – 36 V regulator, an Arduino-compatible microcontroller, and dual motor controllers.
Related products


Home | Forum | Blog | Support | Ordering Information | Wish Lists | Distributors | BIG Order Form | About | Contact
© 2001–2023 Pololu Corporation


